¶ Firewall Inbound Rules
Inbound rules control network traffic entering the system or network from external sources. They determine which external hosts or ports are allowed to reach internal devices or services.
Inbound rules are commonly used to allow access to hosted applications (like web or SSH servers) while blocking all other unsolicited traffic.
Examples:
- Allow incoming HTTP (TCP port 80) and HTTPS (TCP port 443) to a web server.
- Allow SSH (TCP port 22) from specific trusted IPs.
- Block all other inbound connections by default.
¶ Port Forwarding
Port forwarding is part of inbound rule configuration. It allows external clients to reach services hosted on internal systems by mapping an external port on the firewall to an internal IP address and port.
For example:Forward TCP port 8080 → 192.168.1.10:80
This means the inbound rule accepts traffic on port 8080 from outside and forwards it to the internal web server on port 80.
When port forwarding is configured, the return traffic (response from internal server to external client) is automatically allowed if there is no “Deny All” outbound policy applied.
In such cases, you do not need to create separate outbound allow rules for the same ports — the firewall maintains connection state and permits the response automatically.However, if an explicit Deny All outbound policy is in place, you must create corresponding outbound allow rules to permit response traffic. Refer Outbound rules configuration guide for more details.
¶ What is Port Forwarding?
Port forwarding, or port mapping, allows remote servers and devices on the internet to access the devices that are within your private local-area network (LAN) and vice versa.
Essentially, port forwarding maps an external “port” on your internet-facing IP address to a particular computer on your local private network. This allows you (or someone else) to access something on your computer from the internet.
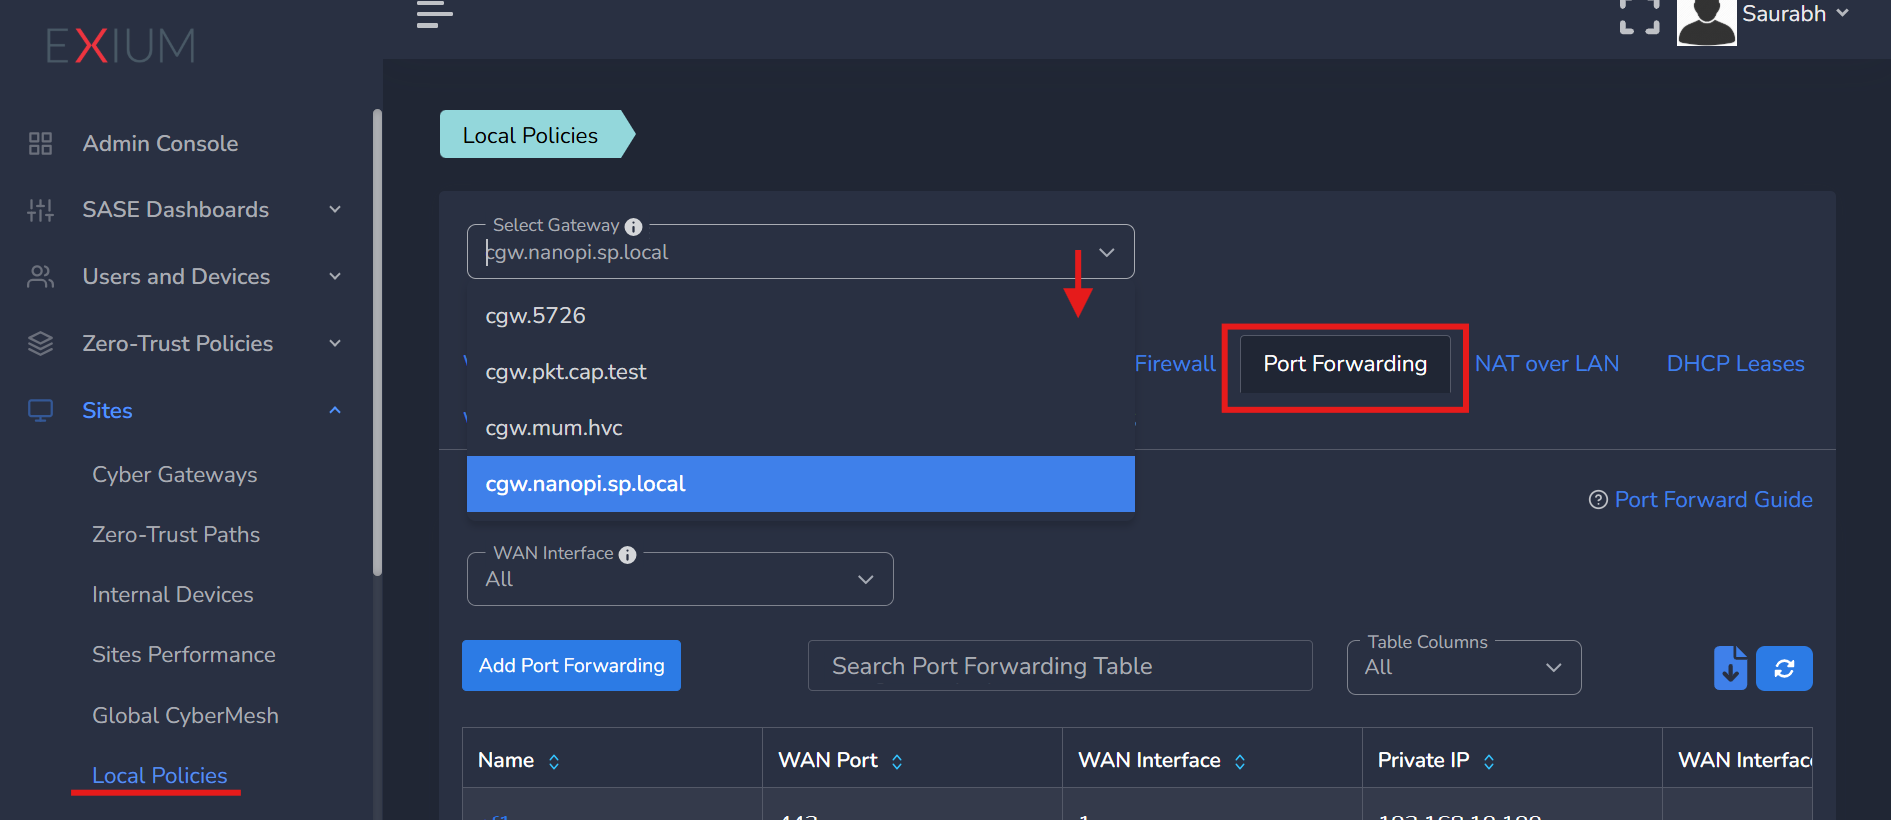
¶ How to Setup Port Forwarding?
To Configure Port Forwarding, follow the steps below:
- Navigate to the MSP admin console -> Client Workspace
- Click on Sites in the left menu bar → Local Policies
- Select Cyber Gateway from drop down list
- Click on Port Forwarding tab
- Click on Add Port Forwarding
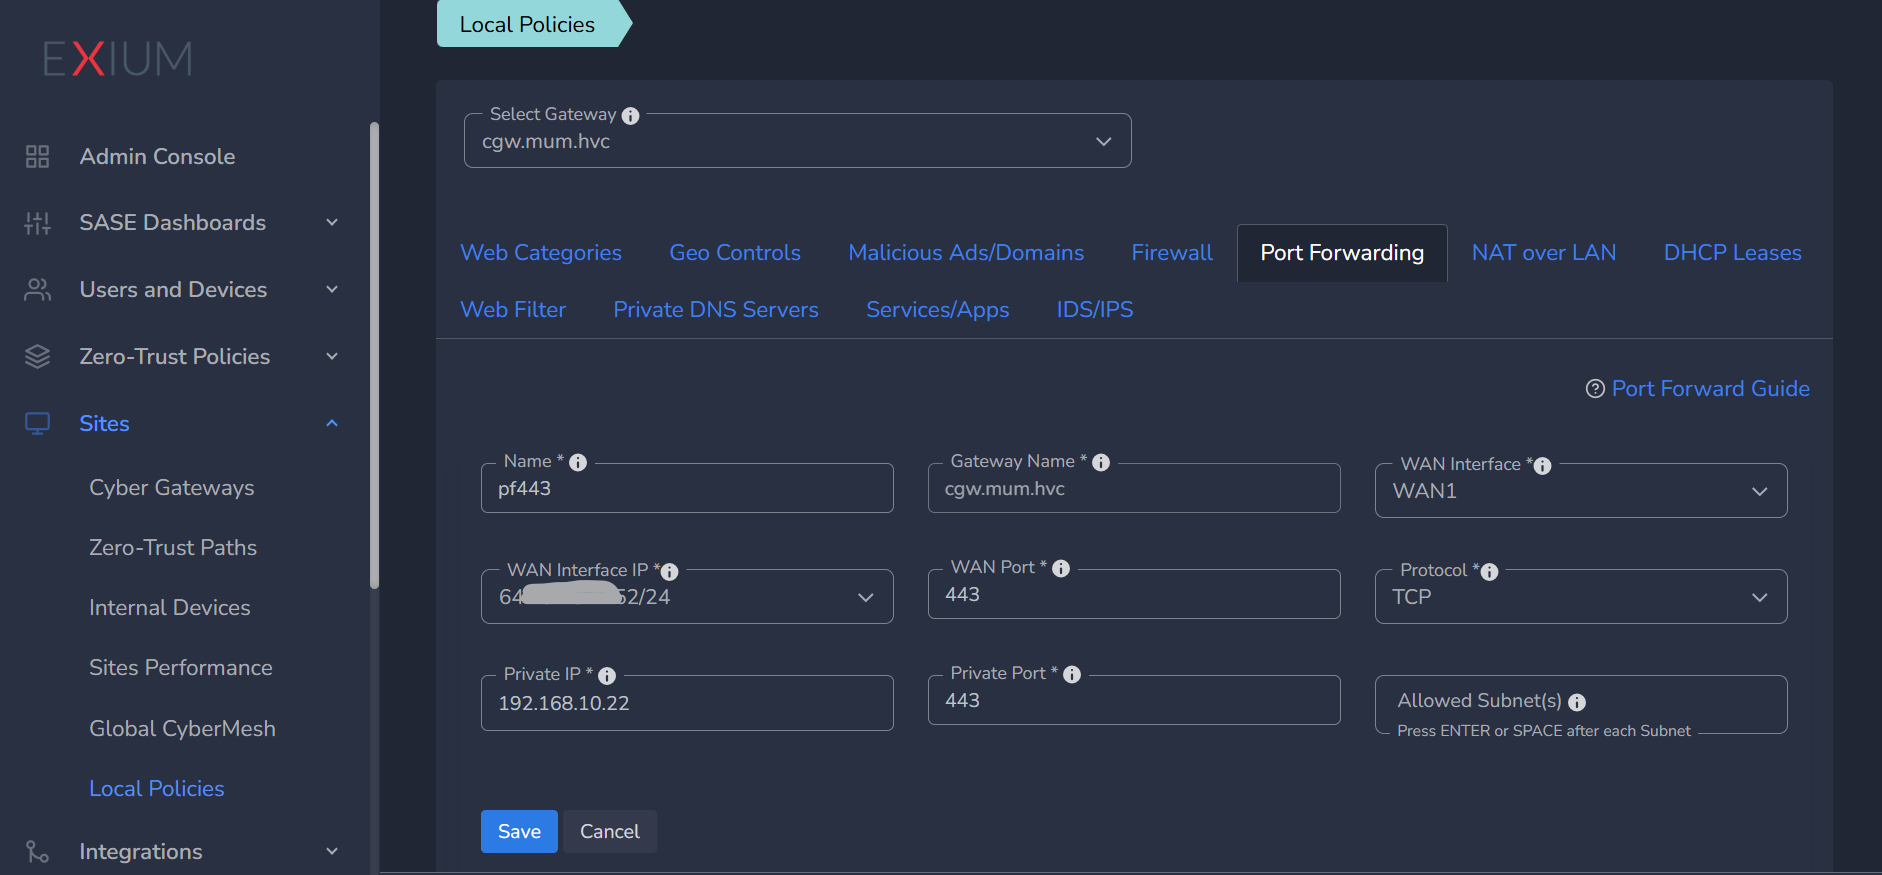
- Enter Name for the port forwarding rule
- Select WAN Interface from drop down list
- If single static public IP is configured on WAN interface, it will show in WAN Interface IP parameter.
- Please select IP, if multiple WAN Alias IPs are configured (refer section Public WAN Alias IPs for more details)
- Add Public/WAN Port, and select Protocol from drop down list
- Add Private IP and Private Port (Target local network IP and port of machine behind Cyber Gateway, for port forwarding)
- Allowed Subnet is an optional field.
- If provided, only that subnet or IP will be allowed to access port forwarding (press space or enter key after each valid entry)
- Multiple allowed subnets/IPs can be configured to access port forwarding (press space or enter key after each valid entry)
- If not provided or blank, there will be no restriction
- Click on Save, Configuration will be applied on Cyber Gateway immediately.
- Admin can edit/update/delete the rule later as per their requirement.
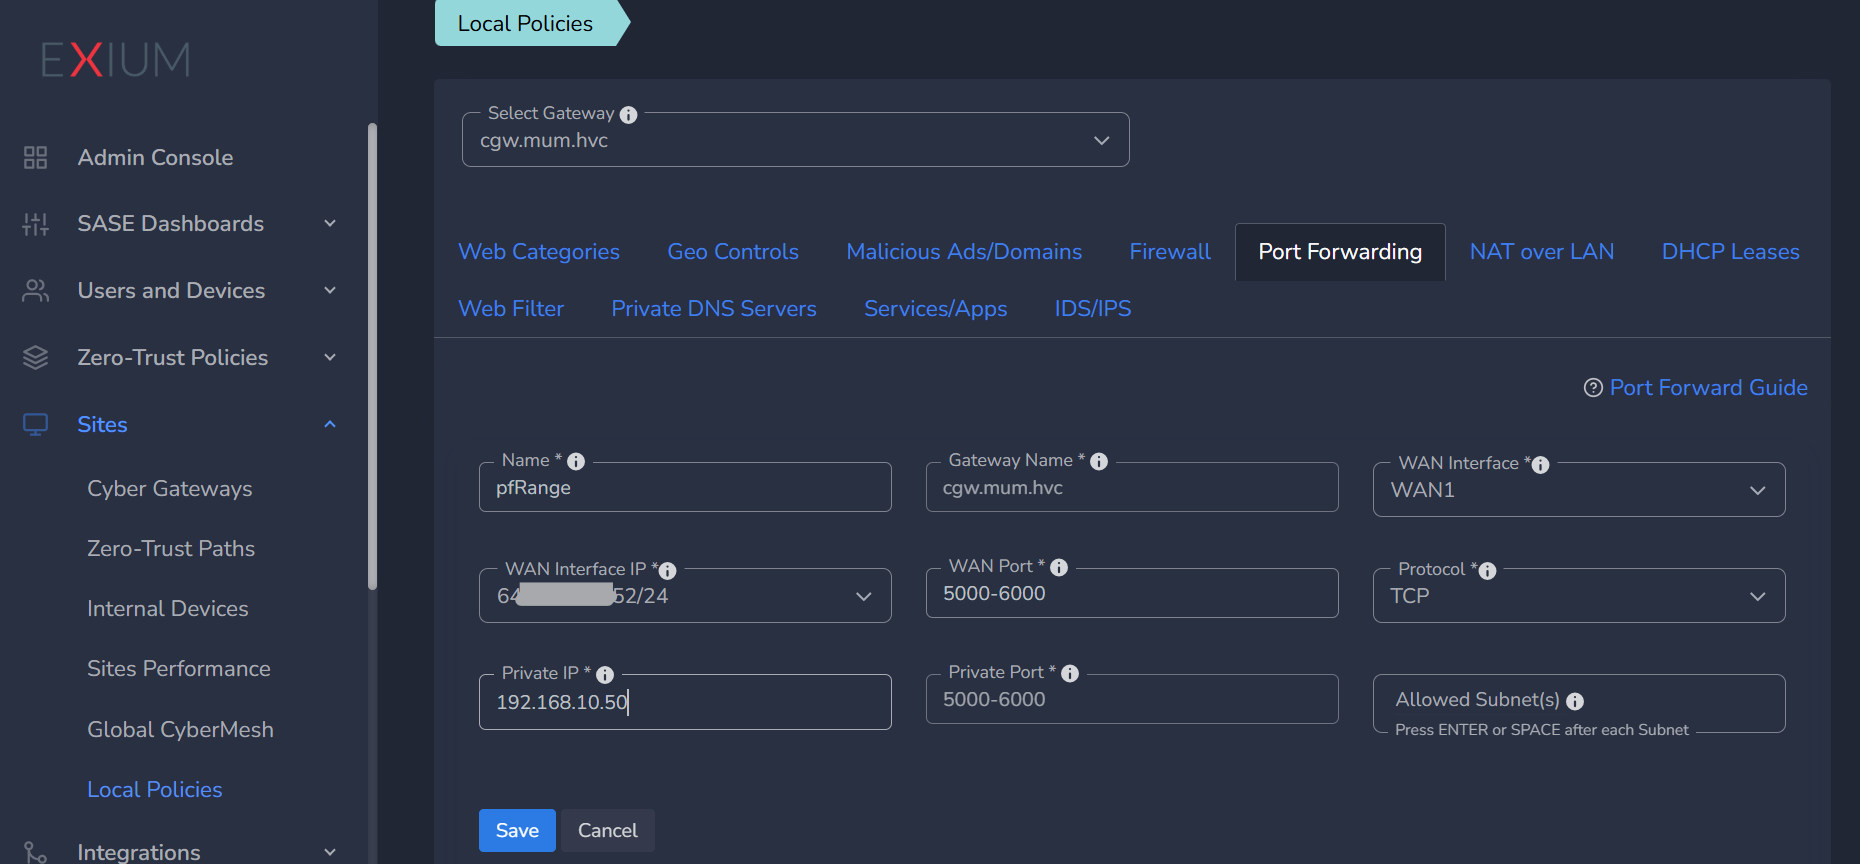
You can also configure port range for port forwarding:
Please refer below example. Once you configure WAN port with range, same value will be auto configured by application for Private ports.
Another example for your Cyber Gateways which are configured with WAN alias IPs. You can choose WAN interface IPs while configuring port forwarding rule.
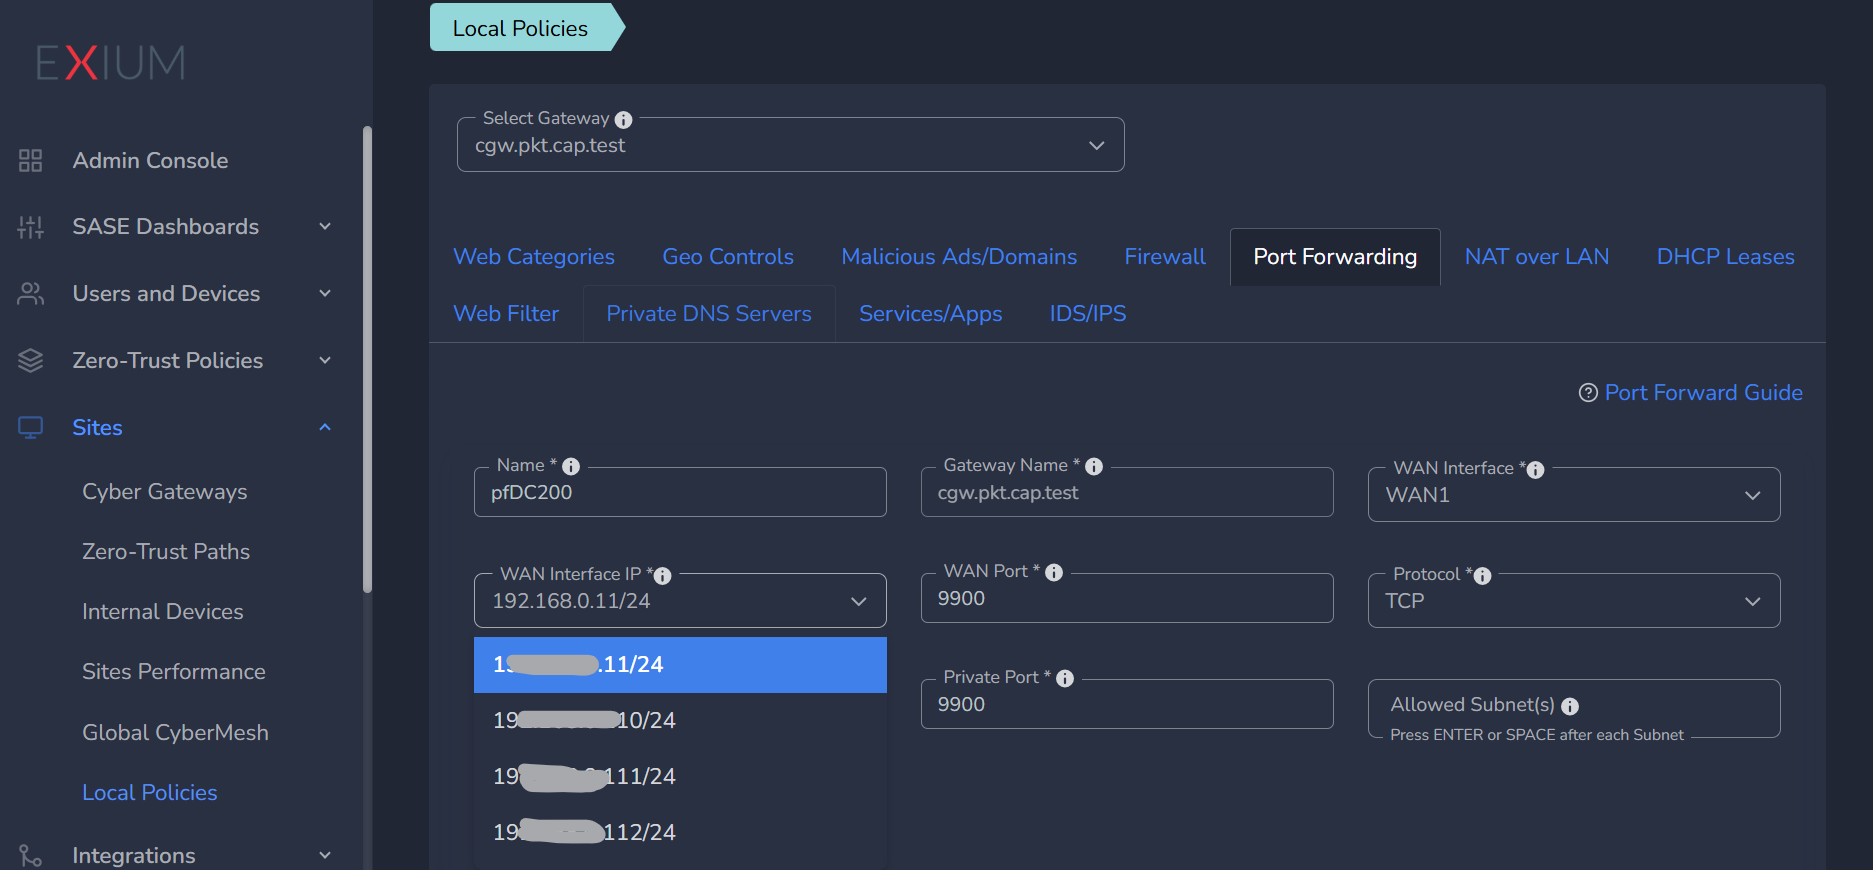
To configure port forwarding rule on default WAN when WAN Alias IPs are configured, you can select primary IP address on WAN (which will be first entry in list) or you can remove IP entry by using backspace from WAN interface IP input and save.
When a WAN interface IP is selected in rule, all the responses going out to Internet from Cyber Gateway will use that WAN IP as source IP.
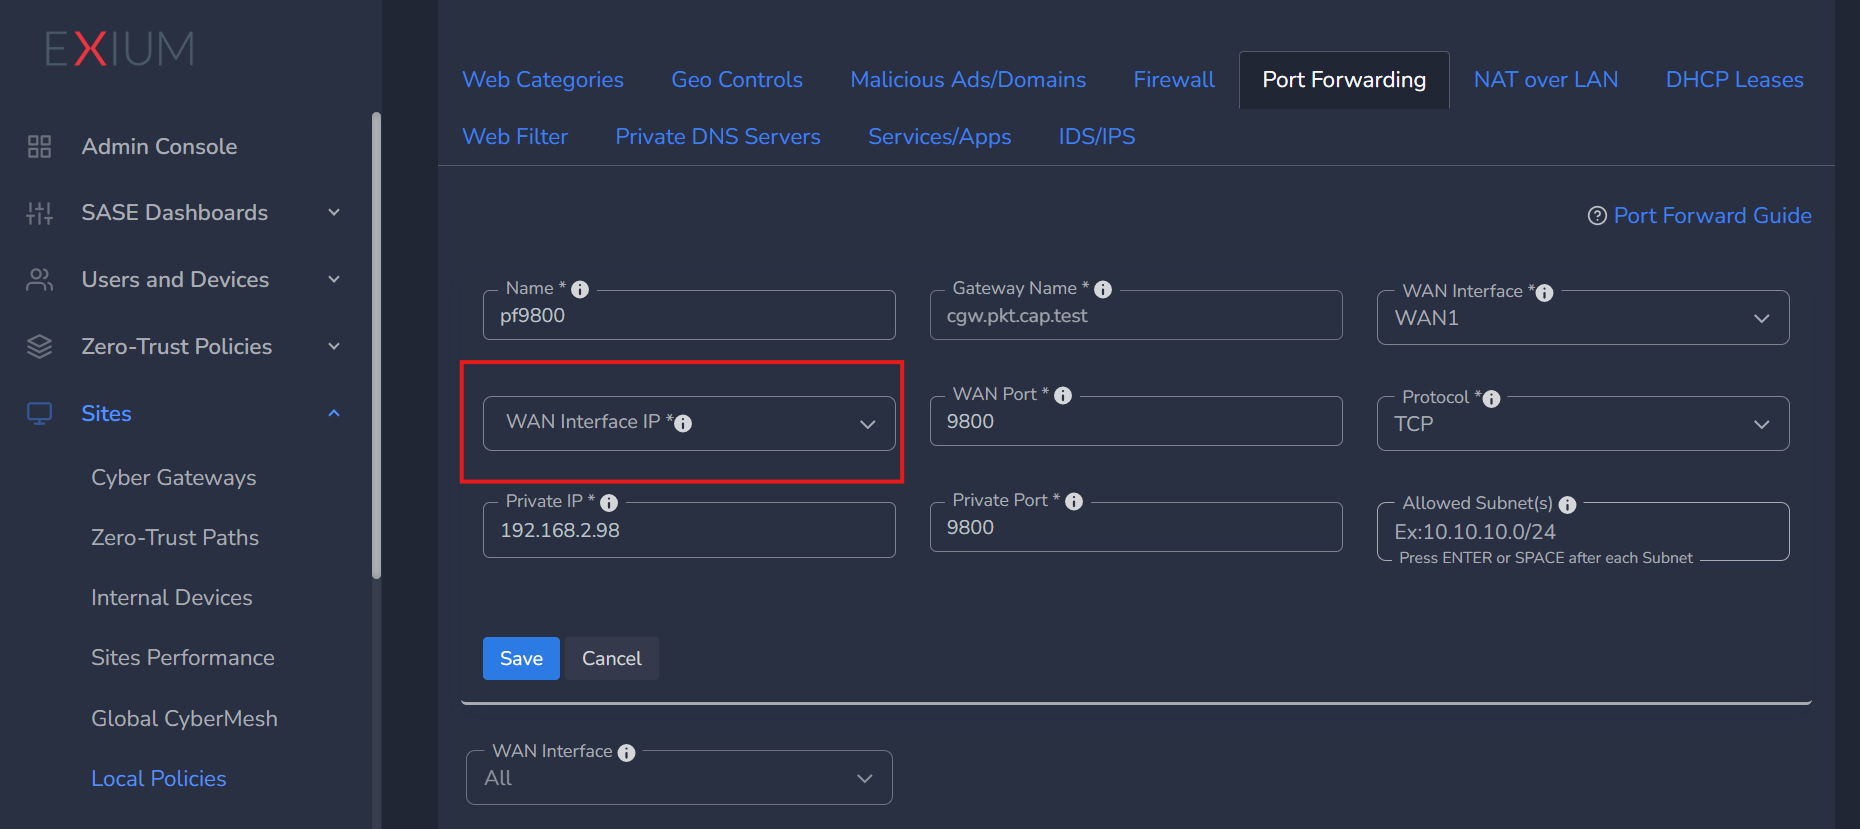
Restricted access - You can also configure Allowed Subnets in case you want to give access of port 9800 to specific source subnet.
¶ Allow Specific Public Subnets
- Enter Name for the port forwarding rule
- Select WAN Interface from drop down list
- If single static public IP is configured on WAN interface, it will show in WAN Interface IP parameter.
- Please select IP, if multiple WAN Alias IPs are configured (refer section Public WAN Alias IPs for more details)
- Add Public/WAN Port, and select Protocol from drop down list
- Add Private IP and Private Port (Target local network IP and port of machine behind Cyber Gateway, for port forwarding)
- Allowed Subnet field defines the specific source IP addresses or subnets that are permitted to access the configured port forwarding rule. This parameter is optional.
- If one or more subnets or IP addresses are provided, only those specified sources will be allowed to access the forwarded port.
- Multiple entries can be configured — press the spacebar or Enter key after each valid subnet or IP address to add them.
- If the field is left blank, there will be no source restriction, and the port forwarding rule will accept connections from any IP address.
- Click on Save, Configuration will be applied on Cyber Gateway immediately.
- Admin can edit/update/delete the rule later as per their requirement.
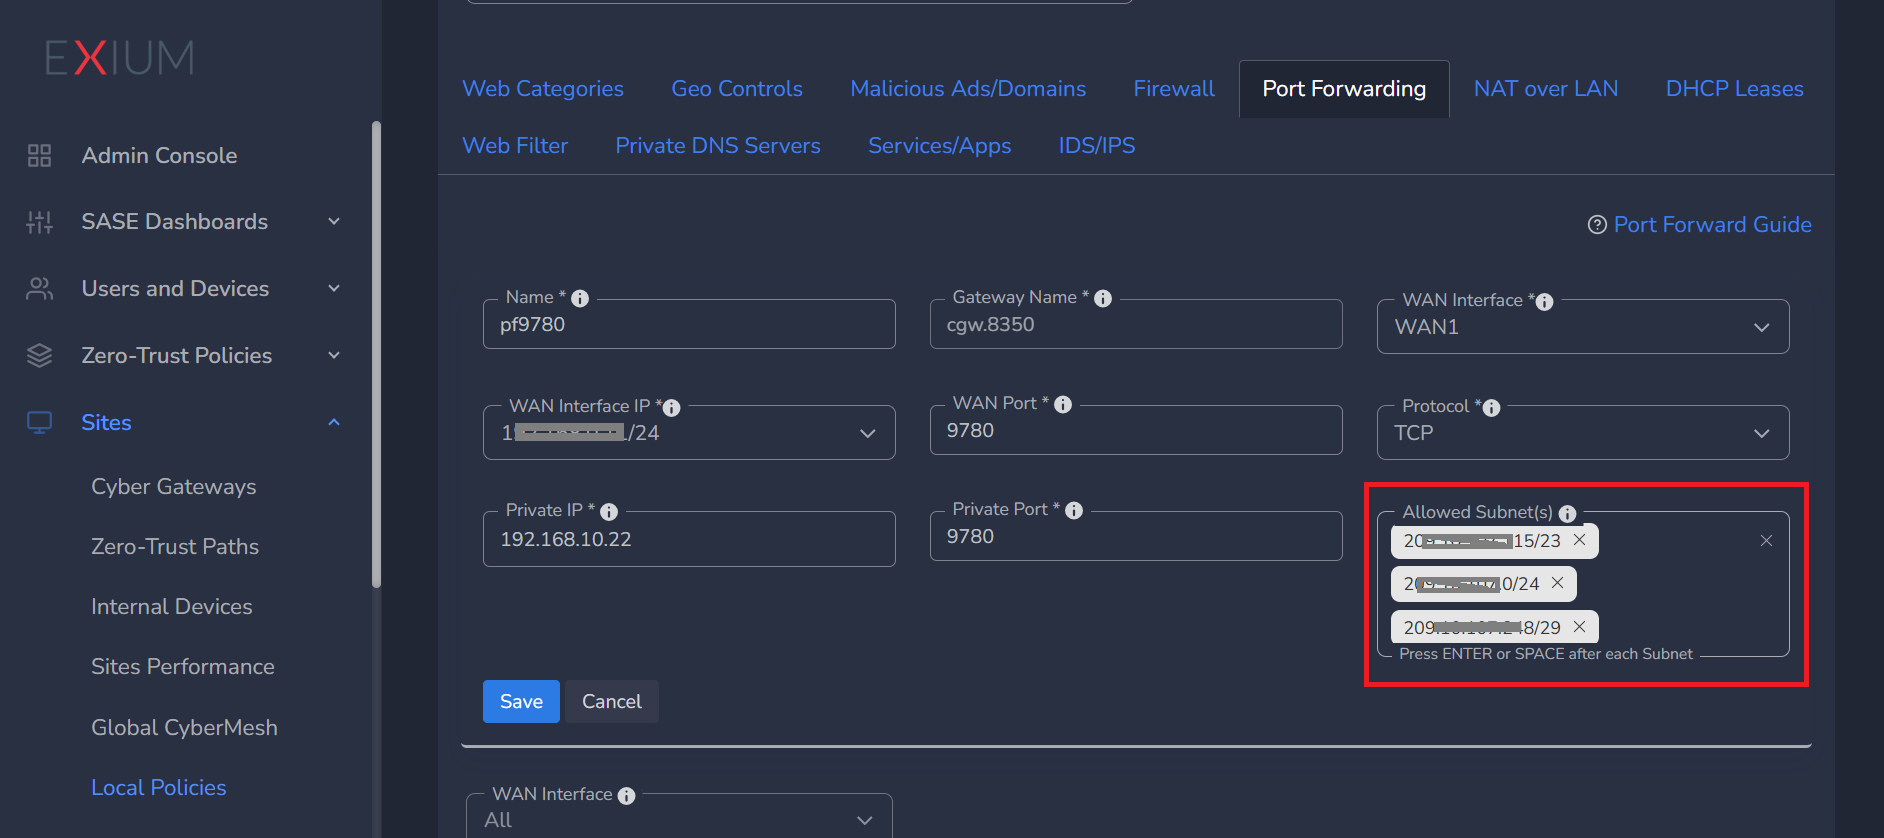
Above example shows that TCP port 9780 which is forwarded to private IP 192.168.10.22 will only be allowed for access to the subnets mentioned in Allowed Subnets configuration field.
¶ How to Delete Port Forwarding?
To Delete Port Forwarding, follow the steps below:
- Navigate to the MSP admin console -> Client Workspace
- Click on Sites in the left menu bar → Local Policies
- Click on Port Forwarding tab
- Select multi interface CGW from drop down list
- On Port forwarding table, scroll to Actions column and click on delete action as shown below.
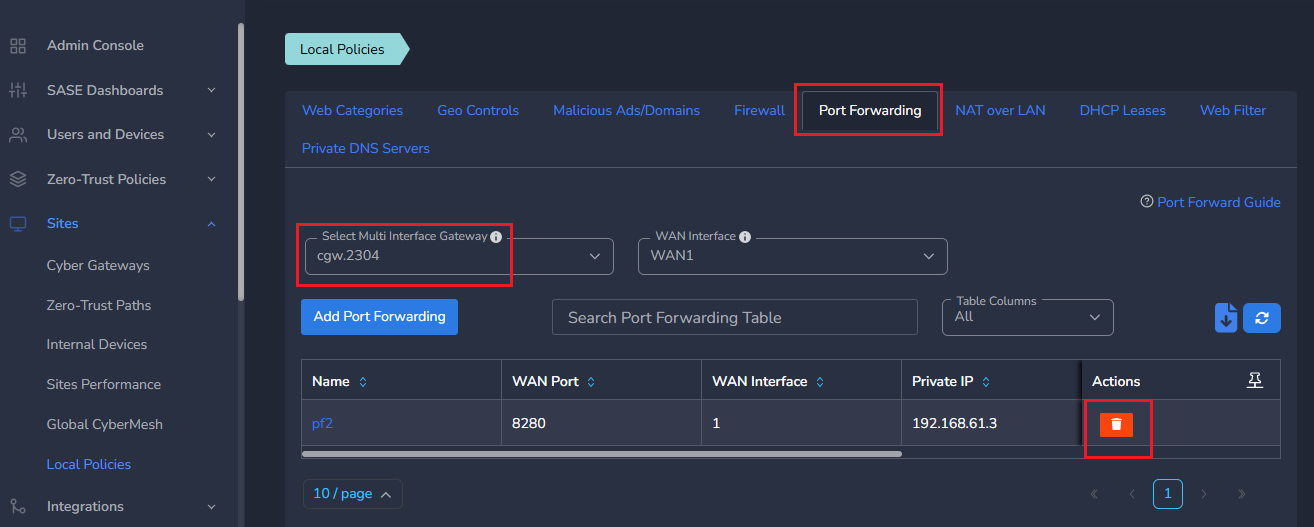
- Click on Delete on confirmation window and it'll delete the port forwarding rule
¶ Troubleshooting
- If CGW machine is running on a public cloud, then make sure the WAN port configured for port forwarding is allowed to be accessed.
- For eg., if CGW is running on Azure cloud, then make sure that WAN interface on CGW has inbound rules configured in Network Security Group (NSG) to allow WAN port configured for port forwarding. WAN interface should have any rules or NSG to block the traffic from public internet except you would like to allow specific IPs to use port forwarding.
¶ How to debug if traffic is not received on WAN interface of Azure VM?
¶ 1. Check Public IP Assignment
- Ensure the VM has a public IP address:
- Go to the Azure portal → Virtual Machines → Your VM → Networking.
- Confirm that the VM has a public IP assigned under the Public IP address section.
¶ 2. Verify Network Security Group (NSG) Rules
The Network Security Group (NSG) may be blocking the incoming traffic.
Steps to check:
- Go to Virtual Machines → Select your VM → Networking.
- Under Inbound port rules, verify if there’s a rule allowing traffic on the required port (e.g., SSH on port 22, RDP on port 3389, HTTP on port 80, HTTPS on port 443).
- Ensure the Source is set to allow traffic from the internet (
Anyor specific allowed IP range). - Ensure the Protocol is correctly set to
TCP,UDP, orAny, depending on your traffic type. - Check that the rule Priority is lower (higher priority) than any blocking rules.
You can also use the IP Flow Verify feature in Network Watcher to check if the NSG rules are correctly configured for specific source and destination addresses.
¶ 3. Check VM Operating System Firewall
Sometimes the VM's internal firewall may block incoming traffic even if the Azure NSG is configured correctly.
Check iptables or ufw:
Ensure that the firewall allows traffic on the port you are trying to use (e.g., 22 for SSH, 80 for HTTP, 3389 for RDP).
¶ 4. Use Azure Network Watcher
Network Watcher provides tools to monitor and troubleshoot networking issues.
- IP Flow Verify: This tool allows you to check whether a specific flow (source IP, destination IP, and port) is allowed or denied by NSGs. If the flow is denied, it will also show which NSG rule blocked the traffic.
- Go to Azure Network Watcher → IP Flow Verify → Select the VM → Enter source/destination IP and ports to test.
- Network Security Group (NSG) Flow Logs: Enable NSG flow logs to capture detailed information about traffic flowing through your NSG.
- Go to Network Watcher → NSG Flow Logs → Enable and configure for the NSG attached to the VM.
- Connection Troubleshoot: Use the connection troubleshoot feature to test connectivity from the VM to a target destination or from external sources to the VM.
- Go to Network Watcher → Connection Troubleshoot → Select the VM → Enter the IP and port you want to test.
¶ 5. Check Azure Route Table Configuration
If custom routing is used, incorrect routes may prevent traffic from reaching your VM.
Steps to check:
- Go to Virtual Networks → Subnets → Route Table.
- Ensure there’s a route to the internet (e.g.,
0.0.0.0/0with next hop set toInternet). - Check if there are any user-defined routes that might block inbound/outbound traffic.
¶ 6. Test Connectivity Using Network Tools
Ping the VM's public IP: Ping can help check basic connectivity, although it might not work if ICMP is blocked.
Use Telnet or Netcat:
- From your local machine, try connecting to the VM's public IP on the relevant port (e.g.,
22for SSH,80for HTTP,3389for RDP).
¶ 7. Check Azure Load Balancer (if applicable)
If your VM is behind an Azure Load Balancer, ensure the load balancer is properly configured:
- Ensure the load balancer’s health probes are correctly configured and the VM is in a healthy state.
- Check the load balancer rules to ensure the correct port is being forwarded to the VM.
- Ensure that the backend pool includes the correct VM and NIC.
Please contact support@exium.net in case issue is not resolved.