¶ Instructions for HA Deployment
In High Availability (HA) deployment, you will need two boxes or two virtual machines (VMs) for the cyber gateway (CGW) deployment. Moreover, if you like to have ISP fail-over, you will need at least two ISP WAN links as shown for the example HA deployment on the Nano Pi R1 Plus LTS in the picture below. When there is a single ISP, you will also need a switch on the WAN side where two WAN links, one from CGW each box will go and the ISP modem/ router will plug in the same switch.
¶ Deployment Instructions for High availability
¶ Pre-requisites
To create a Multi Interface Cyber Gateway (CGW-MIF) with HA, follow the steps below.
- Navigate to the MSP admin console -> Client Workspace
- Click on Gateways in the left menu bar → Add Gateway
- Select Gateway Type as Multi Interface. Fill in the details and add Gateway.
- Please refer Dual Interface CGW Deployment Instructions for other configurations .i.e. LAN subnets.
- High Availability (HA) - Please select Yes to deploy CGW in High Availability mode. 2 Ubuntu VMs or Nano Pi boxes or any other 2 quantity of recommended hardware needed for HA setup
- In case DHCP function is also enabled on LAN, by default, LAN gateway IP will change to .1 (You may edit as per your requirements)
- If DHCP function is disabled, by default LAN gateway IP will change to .254 (You may edit as per your requirements)
Make sure configured LAN gateway IP is not installed on any other machine statically in LAN network.
- Keep WAN Static IP as No (by default) in SD-WAN configuration, if WAN interface IP is allocated with DHCP
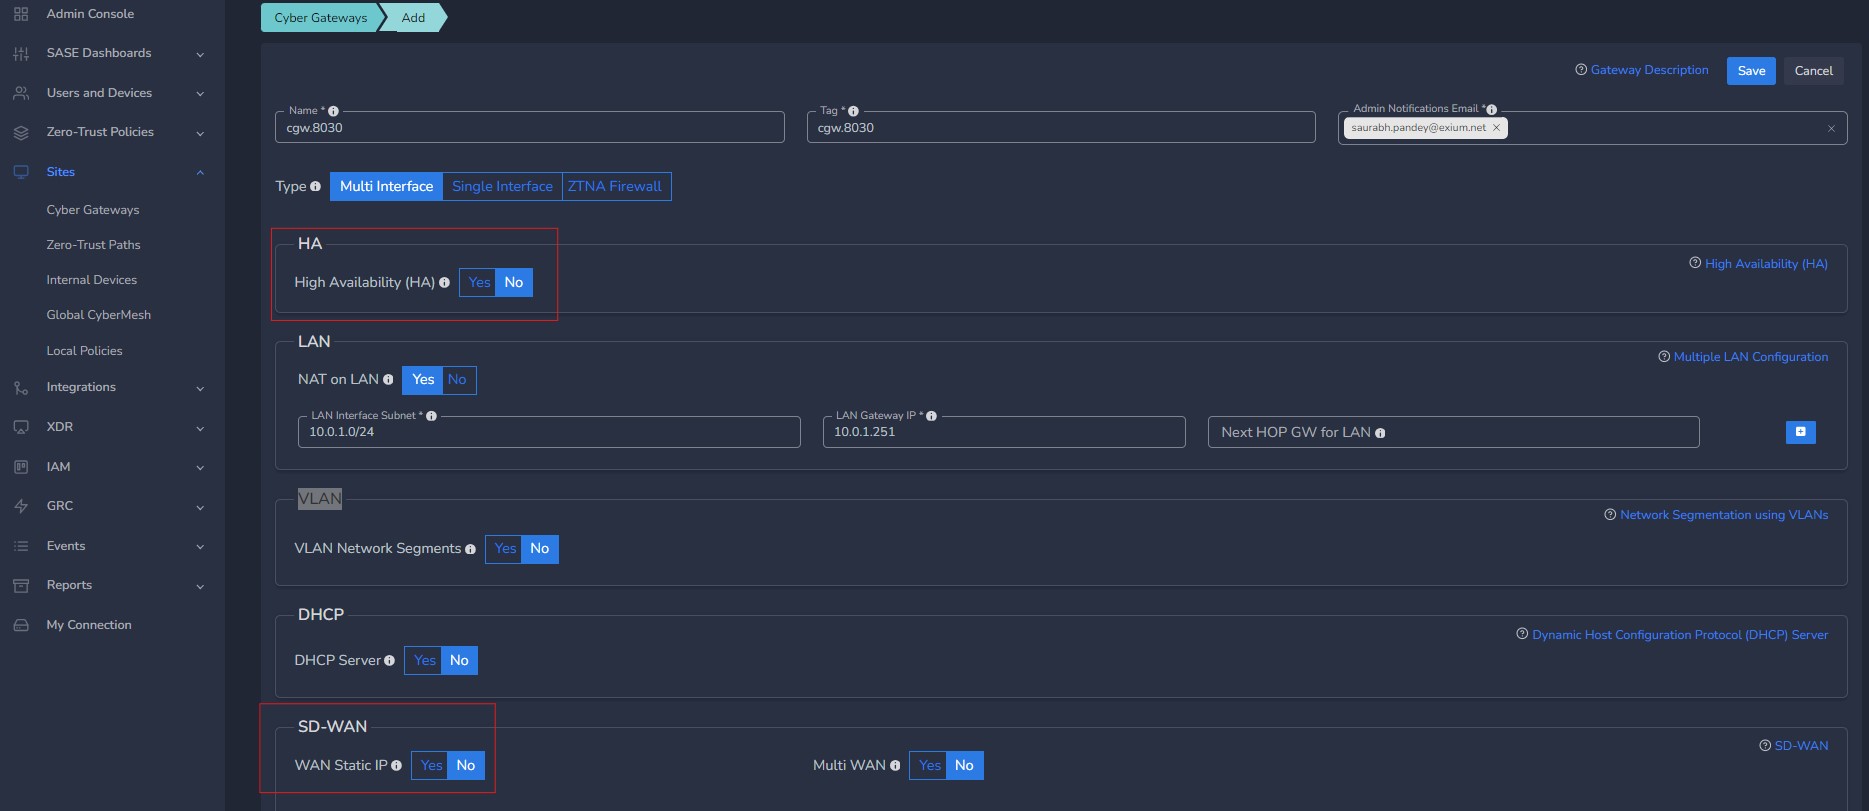
¶ Static IP allocation on WAN with HA
- To configure High Availability with WAN static IP, select WAN Static IP as Yes in section SD-WAN
- Enter Primary Node WAN IP with subnet and WAN Gateway
- Enter Secondary Node WAN IP with subnet and WAN Gateway
CyberGateway with HA deployment needs 2 WAN static IPs ( for Primary and Secondary) . Primary and Secondary WAN IPs should be different.
- Do NOT use IPs in sample picture displayed below.
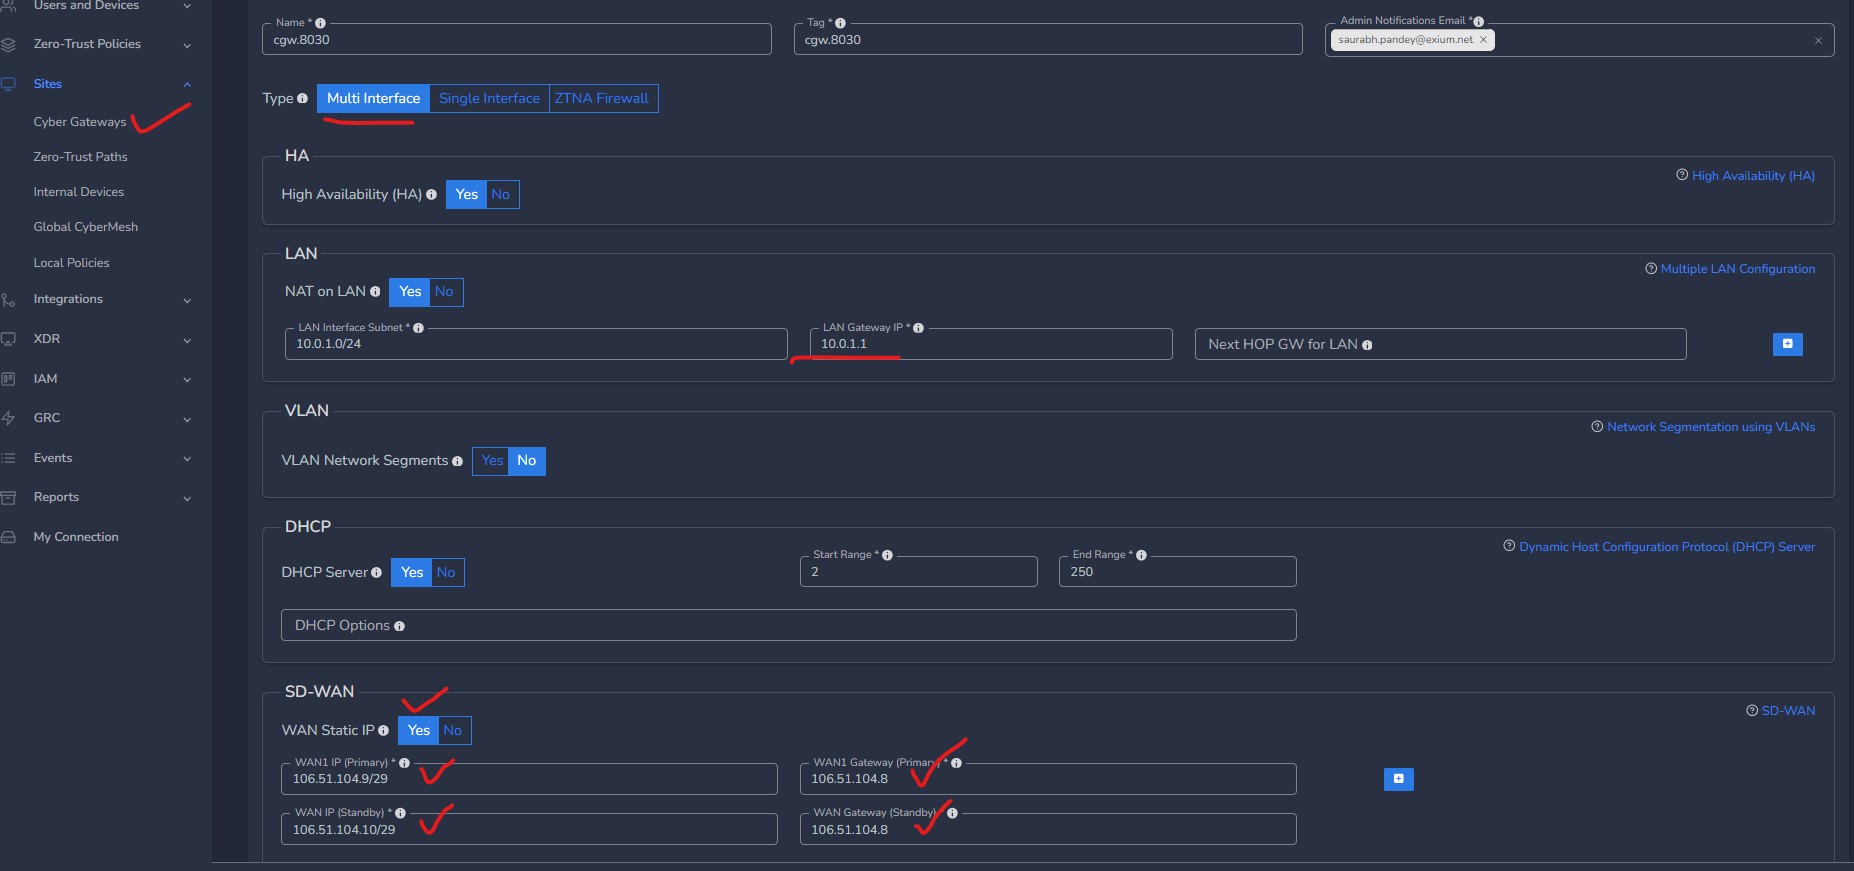
- Click on “Save” to save the configuration
- Copy the installation command if it is a fresh CGW node to be deployed.
- Configuration will automatically update, and primary node will be configured if CGW is already deployed and running.
- No need to create/add another gateway on admin console for secondary node deployment. During installation command copy, user can select Secondary option from drop down list. Both primary and secondary node will share same name. At a time, only one CGW node will be active.
¶ Steps to Install Cyber Gateway (CGW) on Primary Node
Skip installation for primary node, if CGW is already running on a node with the same name which you enabled HA, it will become primary node automatically.)
If it is a fresh installation, you may follow below steps.
- Login to Ubuntu VM or NanoPi box selected for CGW
- Copy Single click installation command from admin console as shown below
Click on icon as show below to copy script to clipboard
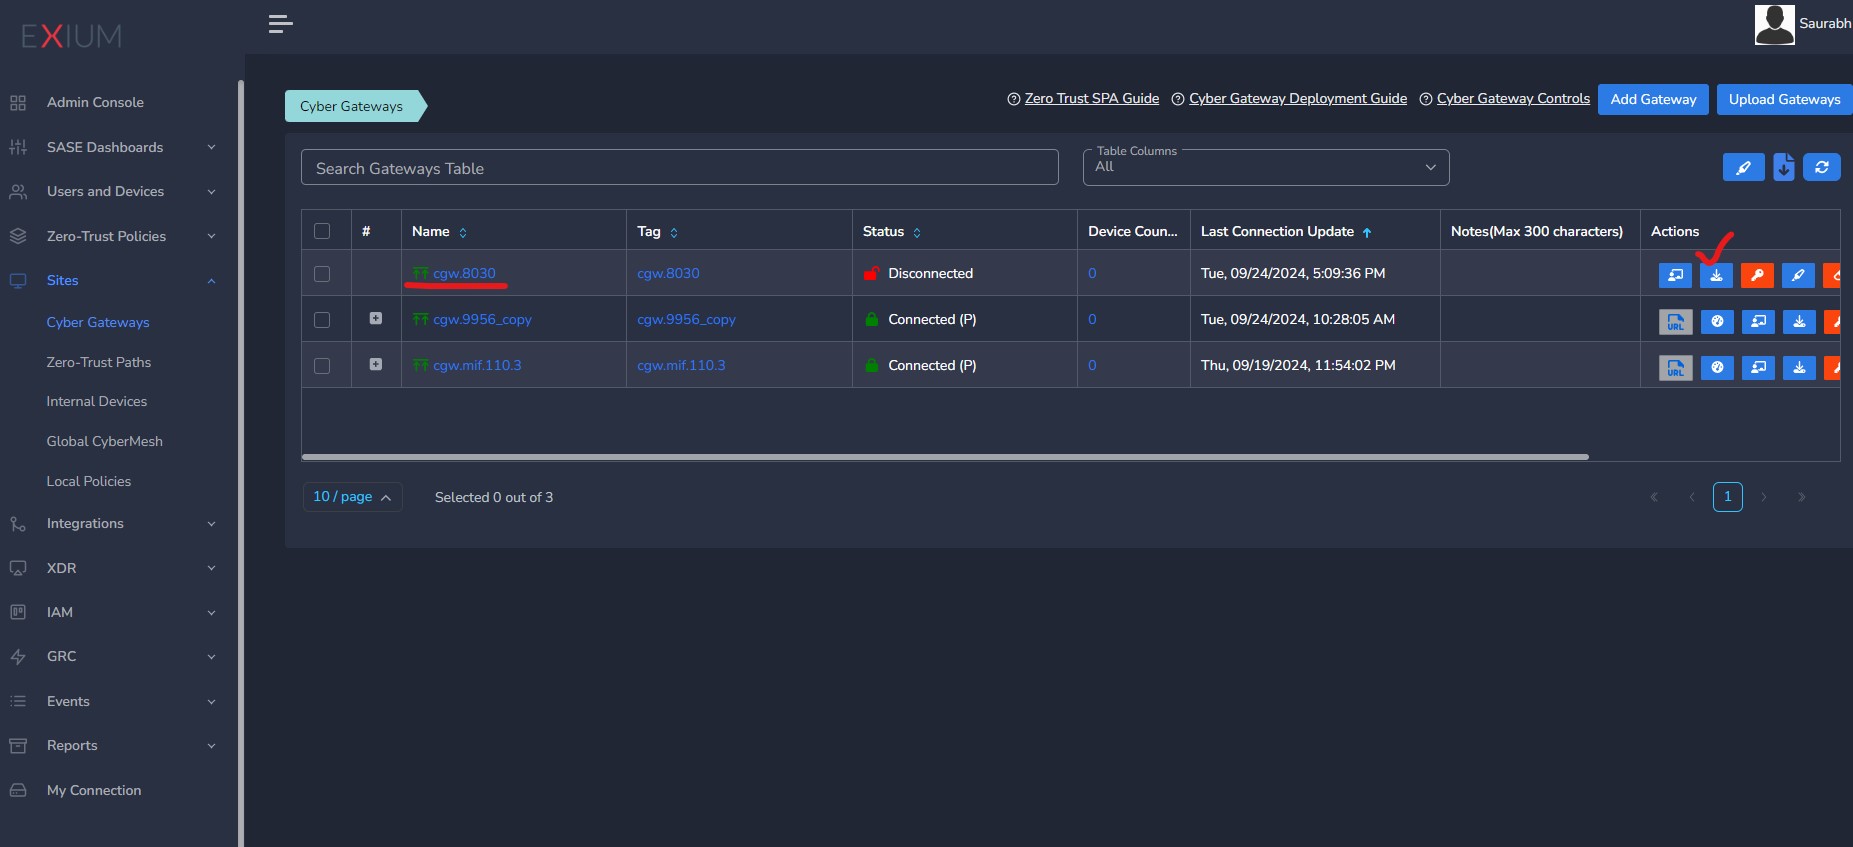
- Get single click installation command from admin console as shown below for Primary node, after enabling HA and reinstall gateway
- Select Primary from drop down list.
- Click on icon as show below to copy script to clipboard
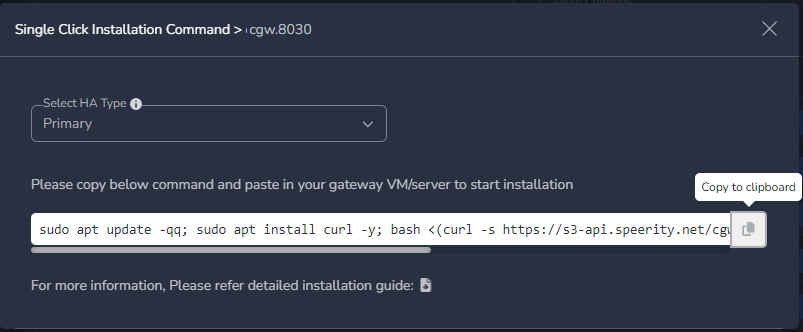
- LAN Gateway IP configured on admin console will be installed on CGW LAN interface as floating IP. It will act like default gateway for LAN subnet or the devices behind CGW when they do inside out access.
- IP .251 of the LAN subnet is reserved for CGW, which will be configured on LAN interface of Primary CGW machine
- IP .252 of the LAN subnet is reserved for CGW, which will be configured on LAN interface of Secondary CGW machine
- IP .254 (in case DHCP on LAN is disabled) or IP .1 (in case DHCP on LAN is enabled) of the LAN subnet will be used as floating IP on LAN interface of CGW. At any point of time, Master/Active node will have floating IP installed on LAN interface, once switchover/failover happens floating IP will be installed on newly elected Master/Active node.
- For eg. - If LAN subnet is 10.0.1.0/24 then IP 10.0.1.251/24 will be installed on Primary CGW LAN interface. IP 10.0.1.252/24 will be installed on Secondary node LAN interface.
- On CGW LAN interface of Master or Active node, IP .1 will be used as LAN Gateway IP if DHCP is enabled
- On CGW LAN interface of Master or Active node, IP .254 will be used as LAN Gateway IP if DHCP is disabled
- This will install all necessary packages for CGW. While installation is in progress, you will be asked to select LAN, WAN Interfaces as shown below

- After this step, installation will continue and takes around 10 ~15 mins to complete installation. Once installation is completed, CGW will reboot and brings it up. Email notification will be sent to confirm CGW installation completes.
¶ Steps to Install Cyber Gateway (CGW) on Secondary Node
No need to create/add another gateway on admin console for secondary node deployment. During installation command copy, user can select Secondary option from drop down list. Both primary and secondary node will share same name. At a time, only one CGW node will be active.
- Login to Ubuntu VM or NanoPi box selected for CGW
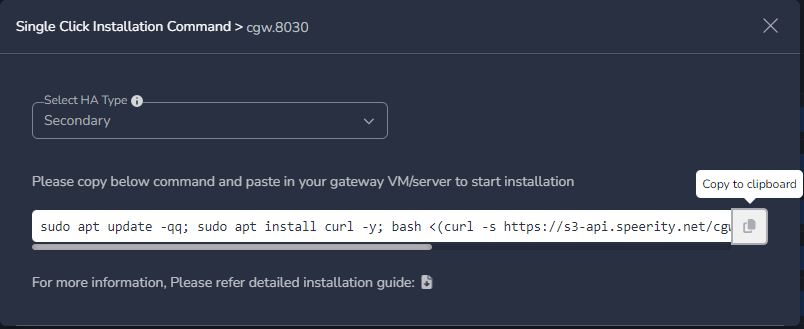
- Copy Single click installation command from admin console as shown below
Click on icon as show below to copy script to clipboard

- Get single click installation command from admin console as shown below for Primary node, after enabling HA and reinstall gateway
- Select Secondary from drop down list.
- Click on icon as show below to copy script to clipboard
- LAN Gateway IP configured on admin console will be installed on CGW LAN interface as floating IP. It will act like default gateway for LAN subnet or the devices behind CGW when they do inside out access.
- IP .251 of the LAN subnet is reserved for CGW, which will be configured on LAN interface of Primary CGW machine
- IP .252 of the LAN subnet is reserved for CGW, which will be configured on LAN interface of Secondary CGW machine
- IP .254 (in case DHCP on LAN is disabled) or IP .1 (in case DHCP on LAN is enabled) of the LAN subnet will be used as floating IP on LAN interface of CGW. At any point of time, Master/Active node will have floating IP installed on LAN interface, once switchover/failover happens floating IP will be installed on newly elected Master/Active node.
- For eg. - If LAN subnet is 10.0.1.0/24 then IP 10.0.1.251/24 will be installed on Primary CGW LAN interface. IP 10.0.1.252/24 will be installed on Secondary node LAN interface.
- On CGW LAN interface of Master or Active node, IP .1 will be used as LAN Gateway IP if DHCP is enabled
- On CGW LAN interface of Master or Active node, IP .254 will be used as LAN Gateway IP if DHCP is disabled
- This will install all necessary packages for CGW. While installation is in progress, you will be asked to select LAN, WAN Interfaces as shown below

- After this step, installation will continue and takes around 10 ~15 mins to complete installation. Once installation is completed, CGW will reboot and brings it up. Email notification will be sent to confirm CGW installation completes.